标签: 图文教程

  • 搬瓦工bandwagonhost VPS忘记续费VPS被Suspended 怎么办?

    搬瓦工bandwagonhost VPS忘记续费VPS被Suspended 怎么办?

    有些朋友的搬瓦工VPS 在生成续费账单以后并没有及时支付,然后加上忙或者其他事情,可能忽然想起来账单还没支付的时候,VPS已经是Suspended的状态了。这时候不要慌,Suspended状态只是暂停,你的VPS还没有被Cancel,只要在Cancel以前支付了账单,VPS就会被重新激活,如果Cancel了。那就彻底完蛋了。

    再来说一下搬瓦工续费的机制。搬瓦工是在VPS到期的当天自动生成一个账单(automatically send a new invoice on the renewal date)。然后你有七天的时间来支付这个账单,这7天VPS是可以正常使用的,如果七天以后还没有支付,VPS就会变成Suspended状态( you will have 7 days to pay the due invoice. After 7 days of non-payment the service will be suspended.)。

    而从Suspended到Cancel还有个几天的时间,在Cancel前,VPS还是可以再抢救一下的。

    当然,如果怕忘了续费,可以提前充值到搬瓦工的账户,到续费的时候就会自动支付了。

  • Vultr月付3.5刀 512内存VPS 购买图文教程

    Vultr月付3.5刀 512内存VPS 购买图文教程

    这段时间主机业界Amazon旗下Lightsail推出了3.5刀配置的VPS杀入低端VPS市场,掀起了不小的波澜。Vultr顺势推出3.5刀512内存500G流量的套餐(含IPV4),包括日本、新加坡、洛杉矶、硅谷、德、法、英、荷、澳等在内的15个机房可供选择,之前的2.5刀配置已经不含IPV4地址了。PS:一个PayPal或者一张信用卡只能充值一个账户,充值多账户会被审查

    Vultr 推出3.5刀月付512内存VPS套餐

    注册地址:http://www.vultr.com/

    机房下载测试

    • 法兰克福(德国) ? ? ?https://fra-de-ping.vultr.com/vultr.com.1000MB.bin
    • 巴黎(法国) ? ? ? ? ? ? https://par-fr-ping.vultr.com/vultr.com.1000MB.bin
    • 阿姆斯特丹(荷兰) ? https://ams-nl-ping.vultr.com/vultr.com.1000MB.bin
    • 伦敦(英国) ? ? ? ? ? ? https://lon-gb-ping.vultr.com/vultr.com.1000MB.bin
    • 纽约(美国) ? ? ? ? ? ? https://nj-us-ping.vultr.com/vultr.com.1000MB.bin
    • 芝加哥(美国) ? ? ? ? ?https://il-us-ping.vultr.com/vultr.com.1000MB.bin
    • 亚特兰大(美国) ? ? ??https://ga-us-ping.vultr.com/vultr.com.1000MB.bin
    • 迈阿密(美国) ? ? ? ? ?https://fl-us-ping.vultr.com/vultr.com.1000MB.bin
    • 达拉斯(美国) ? ? ? ? ?https://tx-us-ping.vultr.com/vultr.com.1000MB.bin
    • 西雅图(美国) ? ? ? ? ?https://wa-us-ping.vultr.com/vultr.com.1000MB.bin
    • 硅谷(美国) ? ? ? ? ? ? ?https://sjo-ca-us-ping.vultr.com/vultr.com.1000MB.bin
    • 洛杉矶(美国) ? ? ? ? ?https://lax-ca-us-ping.vultr.com/vultr.com.1000MB.bin
    • 悉尼(澳大利亚) ? ? ??https://syd-au-ping.vultr.com/vultr.com.1000MB.bin
    • 东京(日本) ? ? ? ? ? ? ?https://hnd-jp-ping.vultr.com/vultr.com.1000MB.bin
    • 新加坡 ? ? ? ? ? ? ? ? ? ? ? ?https://sgp-ping.vultr.com/vultr.com.1000MB.bin

    已经有账号的可以看看别人发现的无损降级指南
    1. 为原来的实例创建 Snapshot
    2. 去 “Reserved IPs” 下把原来的实例 IP 转化为保留 IP
    3. 确认原来的实例 Snapshot 完成后,删除该实例(请注意不要误操作)
    4. 新建一台相同数据中心的实例,OS 选择刚刚创建的 Snapshot,IP 选择你保留的 IP
    5. 恢复完成后,你就获得了一个低价的实例,同时保留了原来的 IP。
    6. 由于保留 IP 会计费($3/mo)、而且在创建的 24 小时内不能移除,所以请在 24 小时后,去 Reserved IPs 将刚刚保留的 IP 移除。
    此操作会产生额外的 $0.108 费用,用于支付 24 小时的保留 IP。

  • FASTPANEL 重置密码图文教程How to reset password

    FASTPANEL 重置密码图文教程How to reset password

    面板中重置用户密码教程

    Go to “Settings” → “Users” menu and in fastuser row click “Change Password”

    In the opened modal window type in your old password, then new password twice and click “Save”

    终端中重设密码教程

    Also you can resetting passwords via command line.

    In order to do that:

    1.Connect to your server via SSH using your root-password:

    ssh root@your.server

    2.?Use a command chpasswd -u user_name -p new_password

    For example to change fastuser password to? 密码 the command should look like the following:

    mogwai chpasswd -u 用户名 -p 密码

    After you run the command you will get the following message:

    Password changed successfully, for login follow https://your_ip:8888/

    NB If password is changed via SSH it is not required to type in an old password

    在终端中,不需要填入旧的密码。
  • Python 爬虫 抓取豆瓣小组图片 通过api提交入库到 Chevereto 图床

    Python 爬虫 抓取豆瓣小组图片 通过api提交入库到 Chevereto 图床

    最近没事弄了一个图床(http://788to.com),然后又比较喜欢豆瓣小组里的图片,所以就想从豆瓣小组抓取图片。老季只对php比较了解,但是php的多线程做爬虫的话还是比较弱的,所以就想到了用Python来做这件事情。

    前篇:Chevereto free版本 使用api 上传图片 图文教程

    注:老季是Python新手,如有不对的地方,希望大神指出。

    下面将python脚本开源:

    #!/usr/bin/python
    # -*- coding: UTF-8 -*-
    # 作者:老季
    # 网址:https://www.jiloc.com/43112.html
    #导入所需的库
    from bs4 import BeautifulSoup
    from urllib.parse import urlencode
    import urllib.request,socket,re,sys,os,json,time,threading,queue
    
    # 获取单页图片方法
    def getImage(url): 
        # 网址
        if url == '':
            print('URL NULL')
            sys.exit()
        print(url)
        print('--- Begin to Crawl Url ---')
        req = urllib.request.Request(url)
        res = urllib.request.urlopen(req)
        data = res.read()
        for link,t in set(re.findall(r'(https://img3.doubanio.com/view/group_topic/large/public/[^s]*?(jpg))', str(data))):
            if  link != '' :
                http_status = http_get(link)
                print( link + ' -> '+ http_status )
    #        print(link)
        print('--- End to Crawl Url ---')
    
    # 获取页面的url地址并使用getImage方法抓取图片
    def getUrlList(url):
        data=urllib.request.urlopen(url).read()  
        soup = BeautifulSoup(data, "html.parser")
        tdList = soup.find_all("td",class_='title')        
        for i in tdList:
            title = i.a.get("title")
            if len(i.contents) > 1:
                i_href = i.a.get('href')
                getImage(i_href)
    
    # 模拟浏览器提交数据
    def http_get(url):
        submit_url = 'http://788to.com/api/1/upload/?key='+urllib.parse.quote_plus('API值')+'&source='+urllib.parse.quote_plus(url)
    #    print(submit_url)
        req = urllib.request.Request(submit_url)
        try:
            res = urllib.request.urlopen(req)
        except urllib.error.HTTPError as e:
            print(e.read())      
            sys.exit()
        # .decode('ascii') : 将byte类型转化为字符串格式
    #    return res.read().decode('ascii')
        data = json.loads(res.read().decode())
        return str(data['status_code'])
    
    #getUrlList('https://www.douban.com/group/meituikong/discussion?start=400')
    print('群组起始地址示例:https://www.douban.com/group/meituikong/discussion?start=')
    theUrl = str(input("请输入豆瓣首页地址:"))
    theEnd = int(input('请输入最后一页的start数字值:'))
    class jdThread(threading.Thread):
        def __init__(self,index,queue):
            threading.Thread.__init__(self)
            self.index = index
            self.queue = queue
     
        def run(self):
            while True:
                time.sleep(1)
                item = self.queue.get()
                if item is None:
                    break
    #            print("序号:",self.index,"任务",item,"完成")
                getUrlList(theUrl+str(item*25))
                time.sleep(1)
                self.queue.task_done()  #task_done方法使得未完成的任务数量-1
                if q.empty(): return
    
    q = queue.Queue(0)
    '''
    初始化函数接受一个数字来作为该队列的容量,如果传递的是
    一个小于等于0的数,那么默认会认为该队列的容量是无限的.
    '''
    for i in range(2):
        jdThread(i,q).start()#两个线程同时完成任务
    for i in range( int( theEnd/25) ):
        q.put(i)#put方法使得未完成的任务数量+1


  • PPTV 会员免费领 图文教程

    PPTV 会员免费领 图文教程

    PPTV 会员虽然没有其他大型视频网站的会员值钱,但是近期也增加了很多片源。
    免费的东西不要白不要,随便动动小手,图个乐呵。
    我已领取,到 2018-01-01 到期。
    PPTV 会员中心: http://viptv.pptv.com/(左侧可查会员时间)

    苏宁 4 个
    http://t.cn/RfCVFDt
    http://t.cn/RfTB89B
    http://t.cn/RfTB89u
    http://t.cn/Rc9aR1f

    滴滴 2 个
    http://t.cn/RfIrKtq
    http://t.cn/RcWCuIN

    腾讯 2 个
    http://t.cn/RfTB893
    http://t.cn/Rtb6PaV

    联通 1 个
    http://t.cn/RcDHlWl

    诱梦 1 个
    http://t.cn/Rcu0oAf

    聚力 tv
    http://t.cn/RVHH1mZ

    电信 2 个
    http://t.cn/RI5mMNU
    http://t.cn/RI5mOJX

    [title]具体步骤:[/title]

    1、先登陆会员中心

    2、用电脑打开以上所有链接

    3、用浏览器模拟wechat打开所有链接,领取会员即可~

  • Git 设置远程仓库 初始化push 图文教程

    Git 设置远程仓库 初始化push 图文教程

    Git – setting up a remote repository and doing an initial push

    There is a great deal of documentation and many posts on Git out there, so this is more of a note to self as I keep forgetting the steps needed to set up a remote repository and doing an initial “push”.

    这里记录一下push远程仓库所需要的步骤:

    So, firstly setup the remote repository:

    首先设置远程仓库:

    ssh git@example.com
    mkdir my_project.git
    cd my_project.git
    git init --bare
    git update-server-info # If planning to serve via HTTP
    exit

    On local machine:

    本地机器:

    cd my_project
    git init
    git add *
    git commit -m "My initial commit message"
    git remote add origin git@example.com:my_project.git
    git push -u origin master

    Done!

    完成!

    Team members can now clone and track the remote repository using the following:

    其他团队成员直接克隆远程仓库内容即可:

    git clone git@example.com:my_project.git
    cd my_project

    Bonus

    To have your terminal prompt display what branch you are currently on in green, add the following to your ~/.bash_profile (I have my current directory displayed in cyan):

    function git-branch-name {
      git symbolic-ref HEAD 2>/dev/null | cut -d"/" -f 3
    }
    function git-branch-prompt {
      local branch=`git-branch-name`
      if [ $branch ]; then printf " [%s]" $branch; fi
    }
    PS1="\u@\h \[\033[0;36m\]\W\[\033[0m\]\[\033[0;32m\]\$(git-branch-prompt)\[\033[0m\] \$ "
  • Chrome一直提示“adobe flash player 因过期而遭阻止”  解决方法 图文教程

    Chrome一直提示“adobe flash player 因过期而遭阻止” 解决方法 图文教程

    最近在更新了Chrome浏览器之后,提示 adobe flash player 已过期的问题,反复提示,从网上也找了很多办法都没有解决。这里给大家提供一个最完美的解决方案。经亲自测试,完美解决adobe flash player插件过期遇到阻止的问题.

    20161111204746
    Chrome一直提示“adobe flash player 因过期而遭阻止” ,解决方法 图文教程

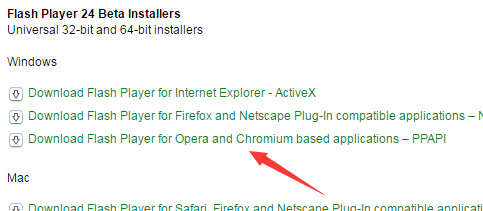
    1. 下载:在百度搜索 ” adobe flash player ppapi “,去官方网站下载完成安装。

      直达地址:http://labs.adobe.com/downloads/flashplayer.html

    2. 下载对应操作系统的PPAPI版本,安装,然后重启浏览器,完成。

      Chrome一直提示“adobe flash player 因过期而遭阻止”
      Chrome一直提示“adobe flash player 因过期而遭阻止”

      Windows 32-bit 64 bit 安装直达链接:https://fpdownload.macromedia.com/pub/labs/flashruntimes/flashplayer/install_flash_player_ppapi.exe

    3. 目前网络上流传的几种方法其实并不能完美解决问题:

      1,浏览器地址栏输入 chrome://plugins 停用过期的 flash player插件,相当于没解决问题;

      2,更新chrome浏览器,其实这个办法很多人都懂,但是也没有用;

      3,下载更新adobe flash player插件,没用!

      4,下载官方adobe flash player 安装更新,试过都知道没用;

      5,Chrome.exe快捷方式加上指令“ –allow-outdated-plugins”不行;

      其实问题的本质在于,Chrome支持的是PPAPI版本,而不是NPAPI版本或者ActiveX;本人试了N多办法,最终完美解决这个问题,写出来希望对大家有帮助。

  • CentOS配置Nginx官方Yum源 进行安装 图文教程

    CentOS配置Nginx官方Yum源 进行安装 图文教程

    nginx

    这不是前两天子凡搞了个小鸟云的免费云主机,正准备搭建个WEB环境来玩玩,结果直接使用“yum -y install nginx”安装才发现默认yum仓库没有nginx,所以就无法直接安装nginx了,所以今天就和子凡一起来简单的配置一下吧!

    由于yum源中没有我们想要的nginx,那么我们就需要创建一个“/etc/yum.repos.d/nginx.repo”的文件,其实就是新增一个yum源。

    vi /etc/yum.repos.d/nginx.repo

    然后将下面的内容复制进去:

    [nginx]
    name=nginx repo
    baseurl=http://nginx.org/packages/centos/$releasever/$basearch/
    gpgcheck=0
    enabled=1

    然后保存“/etc/yum.repos.d/nginx.repo”文件后,我们就使用yum命令查询一下我们的nginx的yum源配置好了没有。

    # yum list |grep nginx
    nginx.x86_64 1:1.10.1-1.el7.ngx nginx
    nginx-debug.x86_64 1:1.8.0-1.el7.ngx nginx
    nginx-debuginfo.x86_64 1:1.10.1-1.el7.ngx nginx
    nginx-module-geoip.x86_64 1:1.10.1-1.el7.ngx nginx
    nginx-module-image-filter.x86_64 1:1.10.1-1.el7.ngx nginx
    nginx-module-njs.x86_64 1:1.10.1.0.0.20160414.1c50334fbea6-1.el7.ngx
    nginx
    nginx-module-perl.x86_64 1:1.10.1-1.el7.ngx nginx
    nginx-module-xslt.x86_64 1:1.10.1-1.el7.ngx nginx
    nginx-nr-agent.noarch 2.0.0-9.el7.ngx nginx
    pcp-pmda-nginx.x86_64 3.10.6-2.el7 base

    如果执行命令是这样的显示效果,那么我们的nginx的yum源就配置成功啦!

    然后要安装我们的nginx就直接执行:

    yum -y install nginx

    如果操作正确到这里nginx环境就已经安装OK了。

    当然你还可以使用命令查一下究竟是否安装完成。

    # rpm -q nginx
    nginx-1.10.1-1.el7.ngx.x86_64

    不解释,已经成功了,并且是nginx官方的最新版本。

  • 微信小视频等素材下载保存到电脑 图文教程

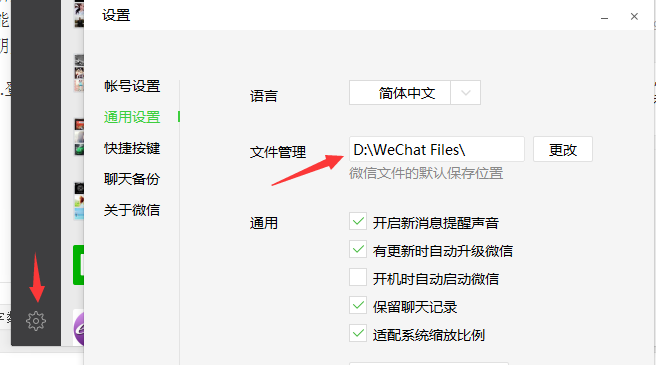
    新版微信朋友圈可以发小视频了,而近日看到很多朋友发的视频想保存下了,点击却发现只有“收藏”或举报功能。而收藏的在清理垃圾后又得在线重新下载才行,总之,最好还是保存到电脑最好了。那新版的微信怎么将朋友圈的小视频下载保存到电脑上才是上策。这里我们还是用电脑来操作方便。

    1.登录到电脑版微信。

    2.打开“设定”–“文件管理”

    20161019103337

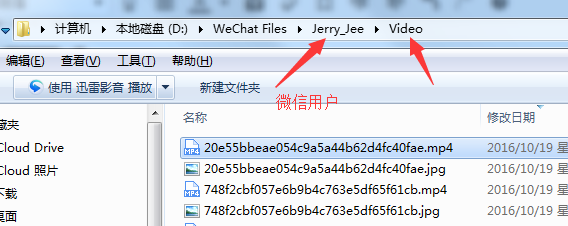
    3.打开对应的“用户”–“video”文件夹即可。

    20161019103554

    这里已被保存为.mp4视频了。


  • git 保存用户名与密码 图文教程

    git config --global credential.helper cache

    … which tells git to keep your password cached in memory for (by default) 15 minutes. You can?set a longer timeout?with:

    记住密码一个小时:

    git config --global credential.helper "cache --timeout=3600"

    Windows客户端保存密码:

    git config --global credential.helper winstore

    或者手动修改 .gitconfig文件:

    [credential]
        helper = winstore
    git config --global credential.helper store
  • CENTOS安装ElasticSearch 图文教程

    CENTOS安装ElasticSearch

    ElasticSearch 概述

    • ElasticSearch是一个高可扩展的开源的全文搜索分析引擎。
      它允许你快速的存储、搜索和分析大量数据。ElasticSearch通常作为后端程序,为需要复杂查询的应用提供服务。
    • Elasticsearch是一个基于Lucene的开源分布式搜索引擎,具有分布式多用户能力。Elasticsearch是用java开发,提供Restful接口,能够达到实时搜索、高性能计算;同时Elasticsearch的横向扩展能力非常强,不需要重启服务,基本上达到了零配置。

    ElasticSearch 安装

    安装前准备
    安装ElasticSearch
    • 运行下面命令将安装包移动到?/opt?目录,然后转到?opt?目录
      mv elasticsearch-2.3.5.tar.gz /opt ; cd /opt
    • 解压安装包,然后重命名为?elasticsearch
      tar zxvf elasticsearch-2.3.5.tar.gz
      mv elasticsearch-2.3.5 elasticsearch
    • 进入elasticsearch/bin下运行elasticsearch脚本启动
      cd elasticsearch/bin
      ./elasticsearch
    如果是用root启动,需要继续下面步骤
    • 如果是用root账号启动,会报以下错误
      Exception in thread "main" java.lang.RuntimeException: don't run elasticsearch as root. at org.elasticsearch.bootstrap.Bootstrap.initializeNatives(Bootstrap.java:93) at org.elasticsearch.bootstrap.Bootstrap.setup(Bootstrap.java:144) at org.elasticsearch.bootstrap.Bootstrap.init(Bootstrap.java:285) at org.elasticsearch.bootstrap.Elasticsearch.main(Elasticsearch.java:35) Refer to the log for complete error details.
    • 这是出于系统安全考虑设置的条件。由于ElasticSearch可以接收用户输入的脚本并且执行,为了系统安全考虑,
      建议创建一个单独的用户用来运行ElasticSearch
    • 创建elsearch用户组及elsearch用户
      groupadd elsearch
      useradd elsearch -g elsearch -p elasticsearch
    • 更改elasticsearch文件夹及内部文件的所属用户及组为elsearch:elsearch
      cd /opt
      chown -R elsearch:elsearch  elasticsearch
    • 切换到elsearch用户再启动
      su elsearch cd elasticsearch/bin
      ./elasticsearch
    • 启动后打印信息如下
      [2015-12-30 10:15:44,876][WARN ][bootstrap                ] unable to install syscall filter: prctl(PR_GET_NO_NEW_PRIVS): Invalid argument
      [2015-12-30 10:15:45,175][INFO ][node                     ] [Grim Hunter] version[2.1.1], pid[26383], build[40e2c53/2015-12-15T13:05:55Z]
      [2015-12-30 10:15:45,176][INFO ][node                     ] [Grim Hunter] initializing ...
      [2015-12-30 10:15:45,243][INFO ][plugins                  ] [Grim Hunter] loaded [], sites []
      [2015-12-30 10:15:45,272][INFO ][env                      ] [Grim Hunter] using [1] data paths, mounts [[/ (/dev/mapper/vg_yong-lv_root)]], net usable_space [33.3gb], net total_space [49gb], spins? [no], types [ext4]
      [2015-12-30 10:15:47,318][INFO ][node                     ] [Grim Hunter] initialized
      [2015-12-30 10:15:47,318][INFO ][node                     ] [Grim Hunter] starting ...
      [2015-12-30 10:15:47,388][INFO ][discovery                ] [Grim Hunter] elasticsearch/fnXUCLOQQBiC1aR7hhB82Q
      [2015-12-30 10:15:50,442][INFO ][cluster.service          ] [Grim Hunter] new_master {Grim Hunter}{fnXUCLOQQBiC1aR7hhB82Q}{127.0.0.1}{127.0.0.1:9300}, reason: zen-disco-join(elected_as_master, [0] joins received)
      [2015-12-30 10:15:50,491][INFO ][node                     ] [Grim Hunter] started
      [2015-12-30 10:15:50,526][INFO ][gateway                  ] [Grim Hunter] recovered [0] indices into cluster_state
    ElasticSearch后端启动命令
    ./elasticsearch -d
  • cloudatcost $7美金 终生VPS 注册图文教程

    cloudatcost 出了最低7美金的终生VPS,不过他们家仅支持PayPal支付。听说网络连接不是很稳定,用来扶墙,练手还是不错的。

    7美金配置:

    1CPU

    512MB RAM

    10GB OF STORAGE

    1gigabit of internet

    网址:http://cloudatcost.com/

    20160823090735


    注册步骤:

    1.点击首页“SIGN UP TODAY!”

    20160823090756

    2.点击”continue”

    20160823091817

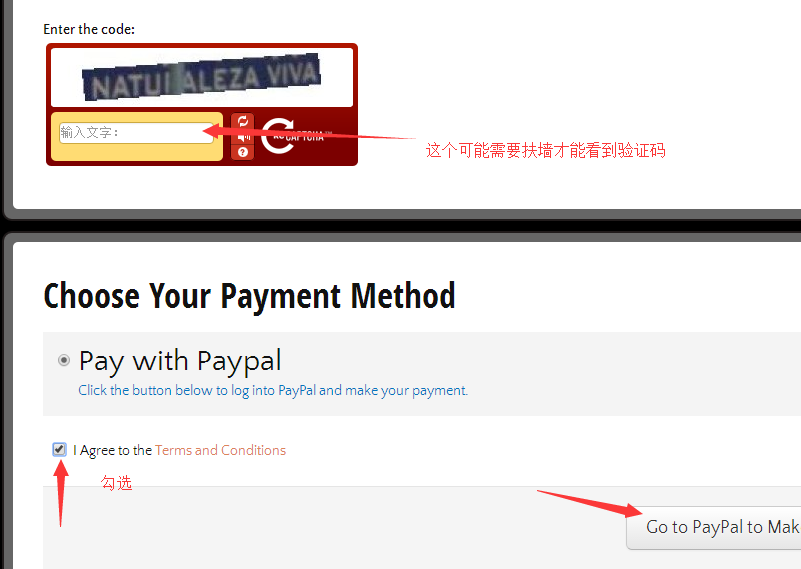
    3.完成账户注册,这里显示优惠$28美金,一共只需要付7美金。

    20160823091915

    4.完成信息填写,完成注册

    20160823092809

    20160823092139


WeChat